Microsoft Windows registry is basically a large database that comprises information, settings, options, and different values for programs and hardware on all operating systems of Microsoft Windows. Windows registry editor is used so that you can improve the performance of your system. Moreover, with the help of this editor, you can manually change the registry keys, but you have to be more cautious while doing these, otherwise your system can be damaged. Also, Read: How to Fix ‘Kmode_Exception_Not_Handled’ on Windows 10
Reason Behind the Broken Registry Items
Sometimes we wonder what causes broken registry items, so here we are mentioning some of the possible reasons. Fragmented Registry: Registry fragments are somewhat like duplicate keys. These have chances to occur when you upgrade, install or upgrade any software into your system. Malware and Viruses: The most common problem is malware and viruses. Viruses attack the registry, which can cause many problems for your computer. Moreover, after removing the Malware, there are also some parts that may be left, and it can cause error messages and slow down. You can clean up your registry so that all the legacy data can be removed. System Shutting Errors: If sometimes our computer gets shut down or crashes. It can be a major problem because when we shut down our computer, the system automatically saves a copy of our registry. Also, Read: How to Fix if Windows 10 Start Menu Not Working
Fix Broken Registry Items in Windows 10
By Using Automatic Repair
This is a useful method to fix broken registry items. This is a new feature in the latest versions of Microsoft Windows which is very reliable for users, and with this feature, they can easily fix their broken registry items and can also repair your invalid and corrupt registry keys. If you are having a broken registry item error, then here are the steps that you can resolve.
Firstly, you have to open the Settings panel and enter its main interface.Now select Update and security.After that, click on Recovery.Below the recovery, you will see a restart now in the Advanced Setup section.
After a while, you have to click on Troubleshooting.
Select Advanced options.
After that, click on Automatic repair/ Startup repair.
At last, you will get into automatic repair mode, and you have to enter the recovery key for going on and then select continue.
After doing all these steps, Automatic Repair will start diagnosing your system and can also restart. So in this way you can fix broken registry items.
By Using System Restore
The function of the system is to restore the point back to where the registries are not broken. Windows can automatically create restore points if you have not enabled the system restore function, but you can also do the changes like the installation of new drivers or software and can create this manually too. Here are the steps to fix broken registry items by using system restore.
Firstly, search the Control Panel in the search bar and select to enter its interface.Now you have to click on Recovery which is shown in view by small icons.
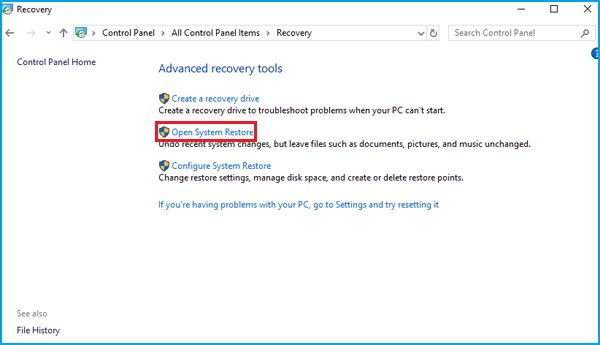
Now select Open System Restore under the Advanced Recovery Tools section.
After that, you will see Restore System files and settings. Click on next to continue further.
After this, you can select a restore point which you have to use from the results list, then click on Scan for effective programs, so that you can check if the drivers and the programs that will be deleted can also be restored. If you are sure about it, then click close to continue.After that, select next.
Now you have to check your information wisely so that you can restore your point and then select Finish.
After a few minutes, the system will start to restore where your registries were not broken, and after that, your computer will restart.
By Using the DISM Command
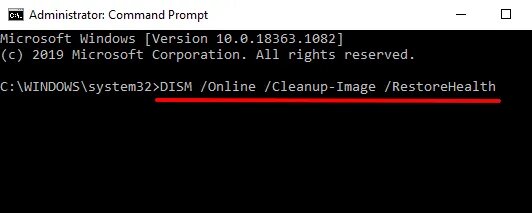
The DISM command is also useful to fix broken registry items errors. If you are not able to fix the error, then you have to perform some steps as sometimes the system file checker scan does not fix all the corrupted files. You have to run the DISM command for scanning.
Firstly, you have to run Command Prompt with Administrator Rights. You can see the detailed process of Command Prompt in the method above.After that, open command prompt window, type the following command, and then press Enter:
After performing these steps your scanning operation will be started, and you have to wait until your process is finished so that your broken registry items can be fixed.
If this method didn’t work in your case, you can try other methods which are given in the article.
By Using the SFC Command (System File Checker)
The System File Checker tool is helpful in fixing a lot of problems related to corrupted files for Windows. Here is how to use it: Step 1: Go to the Windows search bar, type “cmd”, and right-click to ‘Run as administrator’. Alternatively, press the “Windows+R” key, type “cmd” and hit enter. Step 2: In the Command Prompt, type: and hit enter. Now let the tool do its work and after the scan is completed, restart your computer. This shall fix your problem.
By Resetting Windows System
As we know, Windows offers the rest of the functions through which you can reset your PC. Therefore, if users want to remove everything or have to keep their files, this function will help you to reinstall Windows, and through this process, only broken register items can be fixed. Method 1 Below are the steps are given on how you can do it.
Firstly, you have to open the Settings panel and enter its main interface.Now select Update and security.After that, click on Recovery.Then select ‘Get started‘ below the ‘Reset this PC‘ section.
Then if you choose ‘Remove everything‘ your personal files, settings in Apps will be removed but make sure that you have done a backup of all your important files. Moreover, if you choose to ‘Keep my files‘, then it will keep your personal files and will only remove apps in settings.
After that, you have to choose ‘Just remove my files’ or to remove files and clean the drive.The last step is that you have to read the resetting information carefully before resetting your PC, then select reset to start performing.
By performing the above steps according to the desired choices, it will reset your Windows and your broken registry items would be fixed. Method 2 Step 1: Press the “Windows+R” key, type “Powershell” and hit enter. Step 2: Now type the following command and hit enter. Step 3: You can select the ‘Keep my files’ option. Once you do that, the wizard will show you the list of programs that will be removed, if you are okay with it, click on ‘Next’. Alternatively, if you want to completely reset your PC to factory defaults, you can select the ‘Remove everything’ option. Now let the wizard complete the resetting process. It will take some time but it will solve your issue.
Closing Phrase – Fix Broken Registry Items in Windows 10
That was it, we have successfully discussed and try to fix broken registry items in Windows by performing a number of different solutions. In case you didn’t understand something, or you can have any other queries regarding this article, then feel free to comment down below, we will be more than happy to assist you. Also, Read: How to Fix Slow Windows 10 Performance Issues