Many CS:GO players have experienced the same error when trying to matchmake. This is very frustrating. You cannot join matchmaking when this error occurs. It doesn’t mean that you’ve destroyed the game forever, but it might mean that you need to put in some effort to fix it so you can play it again. However, this error can still be fixed. In this article, I’m going to show you 5 solutions that will help you to solve the “VAC unable to verify’ in CS:GO error. So, let’s get started! Also, Read: Who is Marshal in Animal Crossing Game Series?
How to Fix ‘VAC unable to verify’ in CS:GO?
Restart Your Steam Client
If you receive this error, there is probably a corruption issue with your Steam client. To fix this problem, You should restart your Steam client. Let’s see the steps in detail. Step 1: On your Steam client, click Steam in the upper left corner, and after that click Exit. Step 2: Now open your Steam client again. Step 3: Click Steam and select Go Offline. Step 4: Next, click on RESTART IN OFFLINE MODE. Step 5: Click Steam, then click Go Online. Step 6: Click RESTART AND GO ONLINE. Step 7: Launch your game and see if the error “VAC was unable to verify your game session” disappears. In case this method works for you, the error will not appear again. Otherwise, try the next solution.
Verify Game Files Integrity
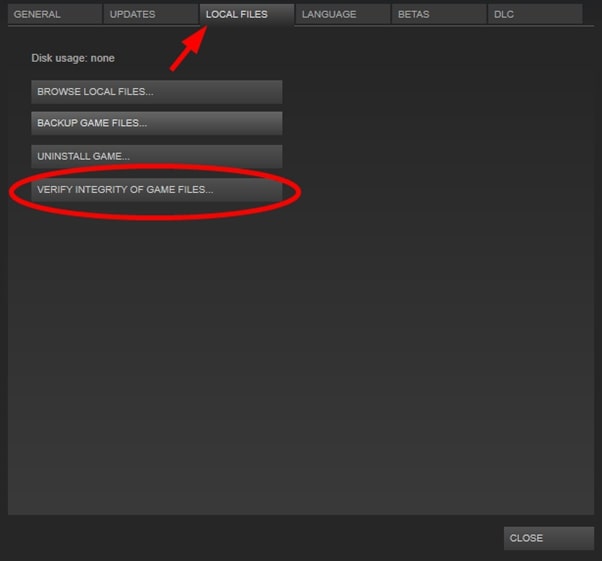
This error may appear because there are integrity issues with your game files. To see if that’s the case, check your game files in your Steam client: Step 1: On your Steam client and click LIBRARY. Step 2: Right-click on your game Counter-Strike: Global Offensive and click Properties. Step 3: Go to the LOCAL FILES tab, then click on VERIFY INTEGRITY OF GAME FILES. Step 4: Wait for the process to complete, then click CLOSE. Step 5: Launch your game. Check if the error has been fixed. After you complete these steps, you should be able to play CS:GO normally, and the “Matchmaking Failed – VAC was unable to verify your game session” error should disappear. Please try the next solution if this does not solve the issue.
Restart the PC
Sometimes, the computer items that are utilized to protect a user’s game rights are already used by other programs, resulting in errors such as “VAC unable to verify your game session”. To fix the error, you should restart your device to remove the programs associated with the error. Now launch Steam and see if CS:GO works correctly without the VAC error message. Otherwise, try the next solution if the problem still exists.
Updated Your Device Drivers
You may face the issue “VAC was unable to verify the game session” if your drivers are corrupt or outdated. Keeping your device drivers up-to-date is very important, especially for graphics card drivers and sound drivers. In this case, updating and fixing these device drivers may also fix the problem. Step 1: Press Win + R to open the Run Window. Step 2: Type devmgmt.msc and click OK to enter Device Manager. Step 3: Double-click Display Adapters to expand it. Step 4: Right-click your graphics card and choose Update Driver. Step 5: Select Search Automatically for updated driver software and follow the onscreen instructions to complete the process. Step 6: After installing the update, the computer will ask you to restart it. Just click Restart now. If the error is gone, then this method was successful, otherwise, try the next option.
Repair the Steam.exe via Command Prompt
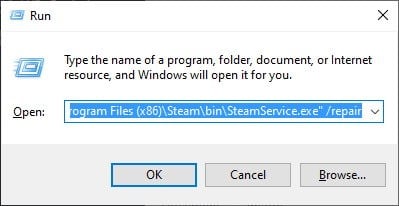
There may be errors on the Steam client that cause “VAC was unable to verify the game session”. Your Steam client may be corrupted, so you get the error on CS:GO. If this is the case, you can repair Steam.exe with Command Prompt. Below are the steps in detail. Step 1: Press Win + R to open the Run window. Step 2: Type cmd and press Enter to open the Command Prompt. Step 3: Type or copy & paste the following command in Command Prompt After that, press Enter on your keyboard. Step 4: Open Steam and launch your game. Check if your error has been fixed. If this method solves your problem. Excellent! If not, let’s move on to the other option.
Uninstall And Reinstall CS:GO
After trying all the solutions from above, reinstalling CSGO can help. To do this, follow these steps: Step 1: Open the Steam client, then click LIBRARY. Step 2: Right-click Counter-Strike: Global Offensive and choose Uninstall. Step 3: Confirm to DELETE. Step 4: Launch Steam again to download and reinstall CSGO.
Conclusion | How to Fix ‘VAC unable to verify’ in CS:GO?
Hopefully, this guide helped you to Fix ‘VAC unable to verify’ in CS:GO. Many users have tried these solutions to solve their problems and they have fixed the problem without any issues. I hope one of the solutions can also be helpful to you. It is best if you stay calm and follow our potential list of solutions from top to bottom. One may not work for you, but by looking into each individually, you’ll end up finding one that does. Please let us know in the comment section below if you have any questions or suggestions. Thanks for taking the time to read! Also, Read: Fix Failed to Detect Location Issue on Pokemon GO (Error 12)